I have now taken five of my six one-on-one introductory lessons with a Handi Quilter educator, Cheryl, via Zoom. (Apparently that was a Back-to-School promotion that I didn’t even know I was eligible for.) The manuals that came with my machine only go so far to tell me how to actually quilt with Moxie. The manuals are supplemented by series of videos on the Handi Quilter website and on the Pro-Stitcher website. Plus, many quilters post their own video tutorials on YouTube.
Having the live Handi Quilter educator is great, because I can ask Cheryl my questions and get a direct answer. I love Zoom. Cheryl lives in Ontario, Canada, and I can see her sewing room, and she can see mine. Magic!
The best way to get to know the machine and the software is to use ALL of the resources. I started out by reading the materials, then watching the videos in between my sessions with Cheryl. She would cover her lessons and my questions, but the real learning came when I actually tried things out under her supervision and on my own. She stood by while I threaded the machine by myself for the first time and watched while I loaded my practice quilt onto the machine. But I’ve done my first stitching explorations on my own.
I first tried free motion quilting. The Getting Started guide suggested stitching cursive e’s and l’s for practice. That should be easy, right? But not for me. I did about five rows, right side up and upside down, and they look like chunky baseball bats. I tried to make them more slender, and more rounded at the top, but I just couldn’t. I see a lot of practice ahead of me.
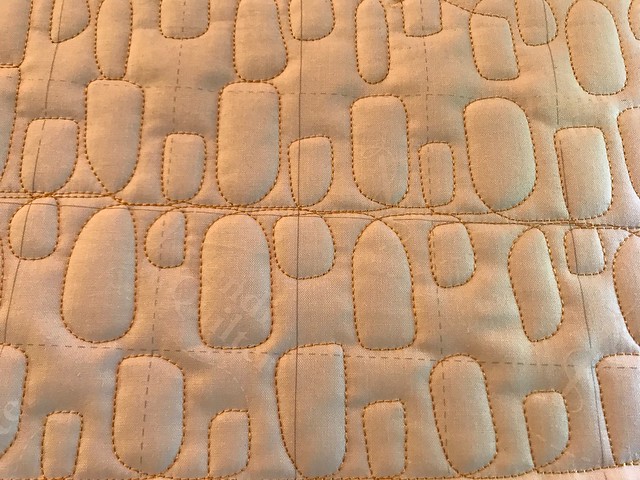
Then I tried stippling. No. I have corners instead of curves. I think I’m moving too fast, too jerky. I think I have to go slower and concentrate on moving smoothly. Like I said, practice.
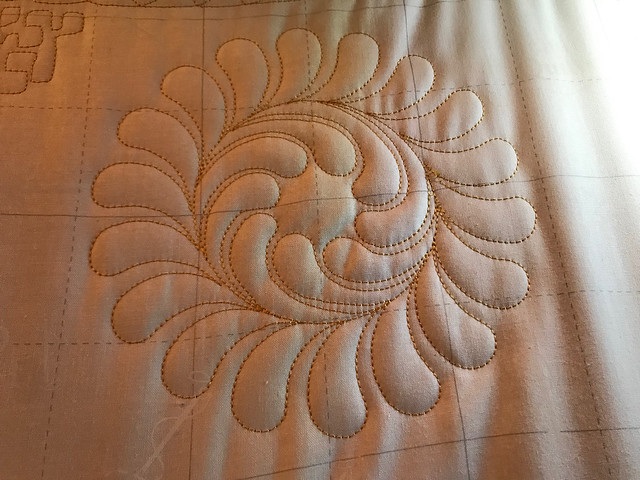
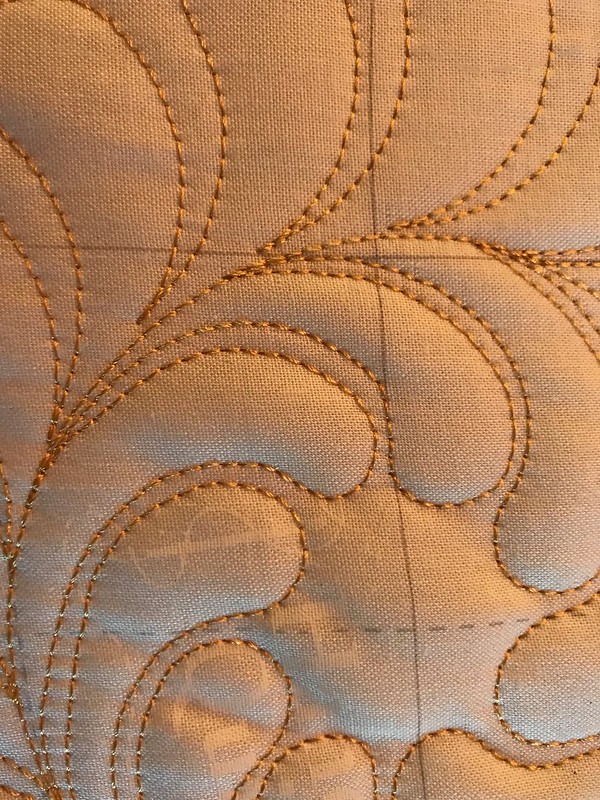
Then I tried the robotic sewing. There are lots of steps in setting things up on the tablet that holds the program. I watched some videos again and made step-by-step notes. Then when I tried it out, it wouldn’t work, so I watched the videos some more. There are so many icons, so many steps, that I missed small parts of the processes when the demonstrator talked fast or didn’t exactly stop and show which button she was pressing on the video. But after about three hours of studying and attempting, I was able to make a feathered wreath.
Much better than what I can do by hand.
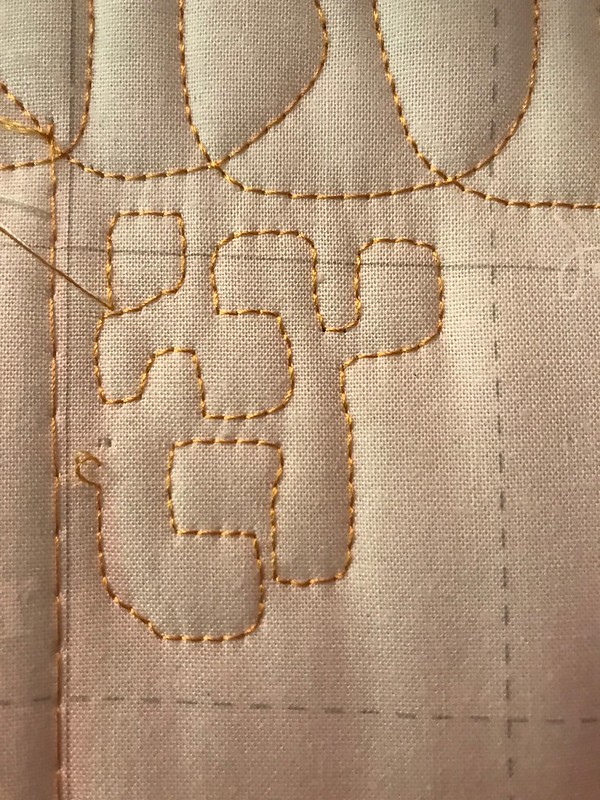
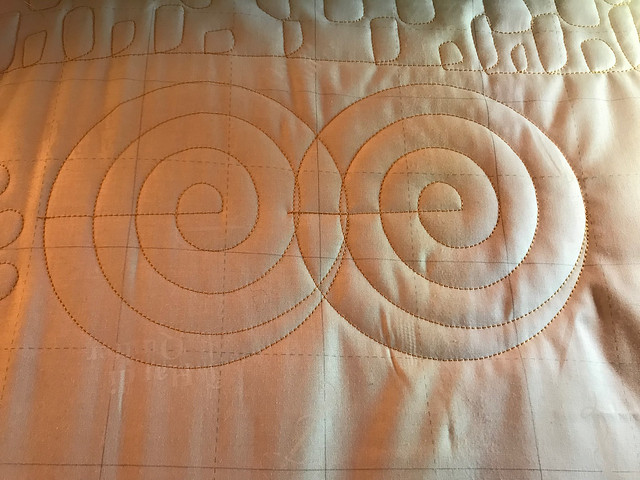
On another day I tried a continuous line pattern, a connecting spiral, but I couldn’t find the video that shows how to repeat a design a few times (as opposed to setting up the whole quilt to be done), so I tried to figure it out myself. I decided to set up a rectangular area that I would quilt with two connected spirals. I thought I sized it perfectly. I lined the first up with the left hand side of my rectangle, and when it was done, I moved the design to the right hand side of my area. As it turned out, I did NOT size it up perfectly, and the second spiral overlapped the first. Oh well. I learned one way that doesn’t work. I asked Cheryl to explain the process to me, and I think I understand better now.
Clearly I need a lot more practice before I attempt to quilt an actual quilt that I want to use or give away.
Loading the quilt on the smaller frame is harder than I expected. It’s hard to get it straight. On the loft frame, you just ratchet it, and it rolls smoothly. With the smaller frame that I have, you remove the clamps, reposition the quilt, and reattach the clamps.
Maybe I’m too old to do this. This machine is expensive—what if I never get good enough to use it properly? Greg really encouraged me to go for it—he even gave me most of the money for it.
They say that one of the best ways to exercise your brain is to learn new things. Hopefully I’ll be continuing to exercise my brain in the coming years and actually get good at quilting.

It looks to me as if you are going well!! I think that it is really
hard to do square curves so it seems that you are ahead of the game with that one!!!! I love that they are giving you lots of instructions and I feel sure that you will be whizzing along soon. Also, I kind of like the overlapped design!!! I can’t wait to see more!!
LikeLiked by 1 person
Thank you, Frances–especially for finding the silver linings in my lack of expertise!
LikeLike
I’m impressed! You’re well on your way to being an expert quilter. Good for you to keep learning new things!
LikeLiked by 1 person
Thanks for your encouragement, Linda.
LikeLike
My mom is starting to love quilting, and she’s probably about your age. 🙂 You’re not too old to try it.
LikeLiked by 1 person
Thanks, Jenna.
LikeLike
You are doing great Andrea! Maybe 15-20 minutes each day, just like music practice?
LikeLiked by 1 person
You make it sound so easy! Thanks, Kathy.
LikeLiked by 1 person
Well, not at first, but I think the daily practice might pay off in some muscle memory which should make things easier.
LikeLiked by 1 person
Hooray for brain exercise. And thank you for reinforcing my prejudice that I don’t want to do this. Still, your first attempts look pretty good to me. Go for it!
LikeLiked by 1 person